Feb 21, 2019
6 Easy Steps to Setting Up a Facebook Business Page
It has become a rule that if you are a small business, you need a Facebook page. With more than 2.8 billion monthly active users on the platform, there are few other places you will get this much exposure. If you think time will not allow you to add this to your already hectic schedule, here are six easy steps to help you set up your Facebook business page in a snap.
Step 1: Create Your Page
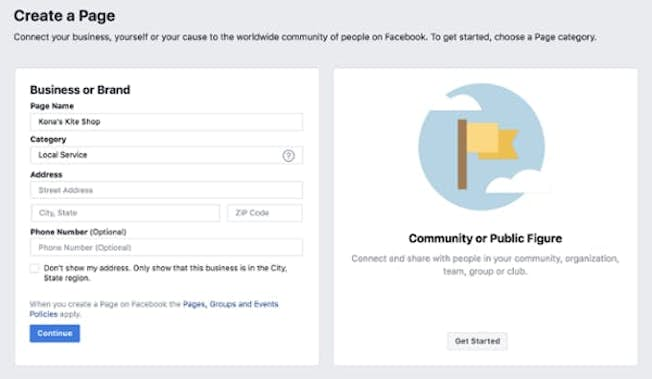
Click here to reach Facebook.
Click “Get started” under the “Business or Brand” option.
Fill out all your information in the fields provided. When filling out your Page Name be very careful that it’s the name you want to live with because you cannot change it. You can change your category if need be. These are the fields to complete:
- Page Name
- Categories
- Address
- Phone number
You will be prompted to upload a profile photo and cover photo. That is important. Although you can update this at any time, you do want to make sure this looks professional and matches your brand because it is going to be what people see whenever they visit your page.
Profile Photo
Your photo will also be the icon that appears whenever you comment on Facebook using your business account or publish anything in your business account’s Newsfeed, so logically it should be your logo.
Your picture should ideally be 170 x 170 pixels, so if you don’t have a logo that fits, design one in a new configuration to use specifically on your Facebook page. It’s worth the effort to maintain a professional look. That is because Facebook does an auto crop for your ads and posts, so sticking to their suggested format works best.
This image spans the top of your page. Take advantage of it and come up with a design that will provide visual interest and a little peek into your brand. Pull at heartstrings, make people laugh, or provide intrigue to catch your visitors’ attention.
Your artwork or image should be 820 x 462 pixels. This size works well for both desktops and cell phones. If you are a really small business without access to an in-house designer, you might want to hire one if budget allows. You can also see if you have some hidden design skills and give Canva a try. It’s free and has pre-made templates that you can use to create something quite respectable.
Upload both of your images, and you can also add a description to your cover photo if you like. Once completed, you will land on your new Facebook page. If your cover photo looks off, you can move it around to get it into the best position.
CTA Button
Below your Cover Photo, you can add a button with a call to action (CTA) such as “Sign Up.” Add one to encourage contact.
Step 2: Complete Your Information
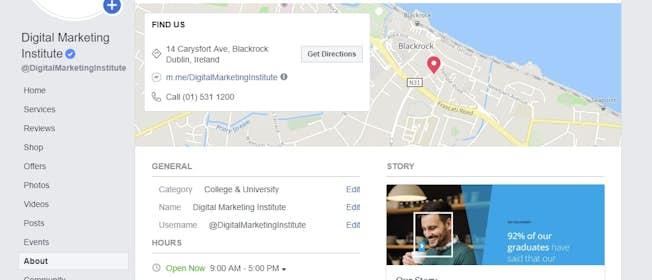
The beauty of Facebook is, if this is your first time, they will provide tips once you land on your new page. But we’ve got you covered here as well.
Go to the top right corner of your page and select “Settings.” It is not the Settings located under the downward pointing arrow. It is Settings beside the Help link. Select “Page Info” on the far-left menu under “General” and complete all of your page information.
These details will appear in the “About” tab of your page. Not all fields will apply to all businesses. However, the most important area is your “Description” and the stuff under “More.” That is your chance to tell people more about you, from your history to your awards and your products to pricing (if you choose to show it.) Also, if you have a brick and mortar location people can visit, make sure you add your address.
Step 3: Customize
A lot of small businesses don’t bother with this step, but it's worth the effort to get your page looking complete. Under the same area that you found your Page Info, you will see “Templates and Tabs.”
Templates 101
Your page will be set to the default when you land here. Click the “Edit” button to take a look at the different templates available. Facebook has named them to help you find the one that will best suit your company but look through them anyway to see which one you prefer.
Tabs 101
Your tabs are the buttons people can click when visiting your page such as reviews, photos, and your posts. You can put them in the order you prefer by just clicking them and dragging them into place. You can also turn them off if you don’t intend to use them. For example, you might not need “Shop” and instead, just have “Services” or vice versa.
Step 4: Assign Roles
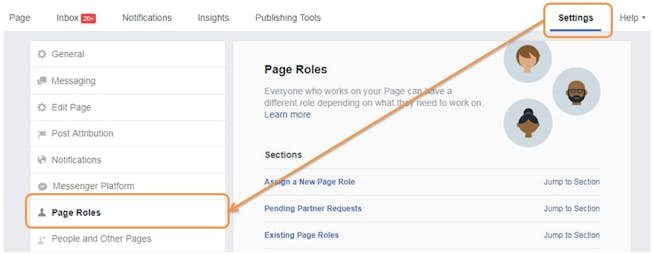
Under General, you will also find “Page Roles." It is only needed if other team members will be sharing Facebook management with you.
Different people can be provided varying access based on a selection of roles ranging from “Admins,” who have complete access to do whatever they want, to “Analysts,” who can view insights and see who has posted or commented on the page. Just type in their name or email and select the role you want to assign.
Step 5: Get Publishing
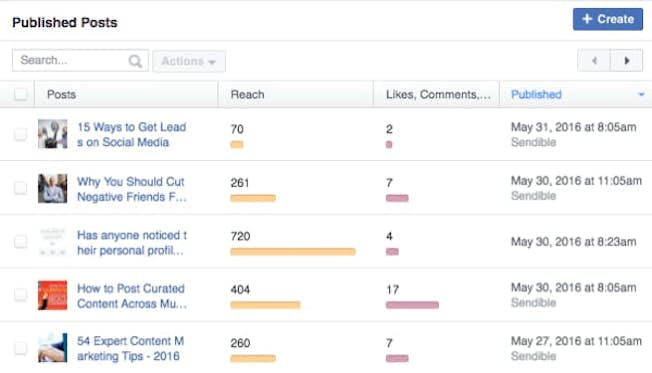
Just to the left of Settings, you can click “Publishing Tools” to add content. Just choose what kind of content you want to add from the left sidebar, including a status update, link, photo, video, event, or milestone.
You want to try out varying posts, but according to a study by BuzzSumo, videos get twice the level of engagement on average compared to other types of posts. Continue to post a few times a day to gain momentum.
Step 6: Boost Your Post
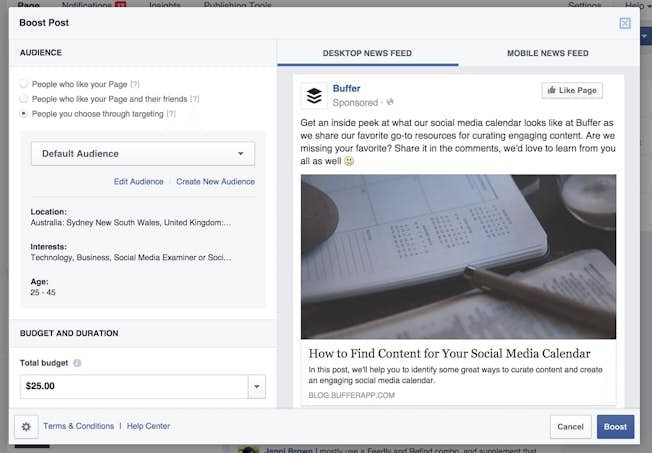
There are too many Facebook ad options to cover here. To get you familiar with the process, we’ve chosen the Boost Post option. Once you have published at least one week's worth of posts, you can try boosting the most successful one.
Click the “Boost Post” button in your post and click “I Accept.”
Your post will appear on the right. You will see a “Learn More” button in grey within your post. That connects to the link you’ve added to your post. Click the “Learn More” menu on the left, and you can choose your CTA for your button.
Next, choose your audience. We recommend selecting the “Create New Audience” option as it will allow you to refine your target. Click the criteria to match certain personas or to refine based on your usual ad target. Facebook will tell you how many people you will reach based on your criteria, so you can expand or make changes to your audience.
Turn on “Automatic Placements” to get the best ROI.
Set your budget based on how much you are willing to spend and the duration you wish to run your ad:
- Set your total budget, and Facebook will tell you the estimated number of people you will reach to help you calculate your ROI. You can decide if you think you have to raise or even have the opportunity to lower your budget.
- Set the date of how long you would like to run the ad. Facebook will tell you the estimated spend each day. You can adjust your budget as needed.
- Turn on Facebook Pixel to track your ad and the clicks to your post link.
- Add payment and click “Boost Now.”
And you’re done!
These steps will help your business begin its Facebook journey with a boosted post to help get you familiar with how everything works.
Become a social media expert and learn how to create successful Facebook business pages with a DMI Social Media Marketing course.
Upgrade to Power Membership to continue
your access to thousands of articles, toolkits, podcasts, lessons and much much more.
Become a Power Member- Login
- View Courses
- - - -
- Courses
- Resources
- - - -
- My Account
- Change Password
- Logout


